
Knitting may be one of the most relaxing crafts out there, and it can result in extremely beautiful creations!
However, if you’ve yet to pick up your own set of knitting needles, you may not know just how diverse this seemingly plain hobby can be.

For instance, have you ever heard of the Kitchener stitch?
What is a Kitchener Stitch?
The most experienced knitters know how to flawlessly combine two pieces of knitting as easily as if they were sewing a seam with fabric and thread.
That’s because they’ve practiced their Kitchener stitches! Kitchener stitch knitting, also known as grafting knitting, is a way to join different knitted pieces together without truly separating the patterns.
The best Kitchener stitches can even make it appear that the two pieces were one continuous section all along!
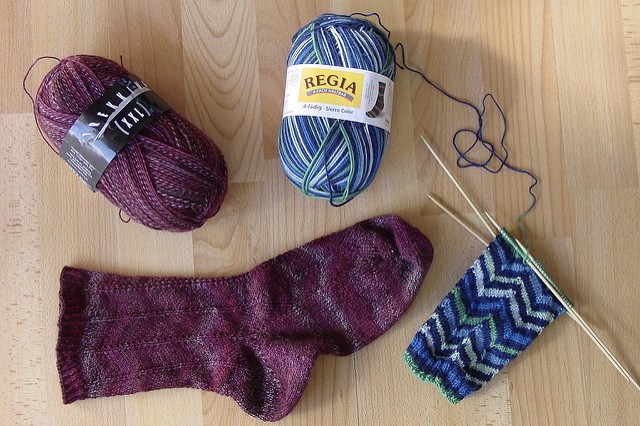
The technique’s name comes from one Horatio Herbert Kitchener, a soldier and dedicated knitter who popularized the stitch by using it in socks for the military during World War I.
Back then, the idea was to ensure that the main body of a sock connected to its toe with a fluid seam, rather than a prominent one. In doing so, a military march would be far less uncomfortable!
Today, the Kitchener stitch is used for that and so much more. Grafting knitting is excellent for all sorts of crafts, from pillows to plushies to sweaters.
Here’s what you need to know to get your Kitchener stitch just right.
Kitchener Stitch Step-By-Step
Clever knitters warn that the stitch itself isn’t complicated to do.
However, written instructions for the Kitchener stitch can be lengthy, so it’s important to keep an eye on your current location in the process!
Prepare Your Stitch
To combine two knitted pieces, keep the edges you want to combine on the knitting needles. This is also known as keeping the stitches “live.”
Make sure you have the same number of live stitches on each needle, so as to ensure your Kitchener stitch will be even. The pieces themselves should be facing outward, with the purl stitches on the inside.
Hold both needles parallel to each other, with the needles facing the same direction. This is the starting position for grafting knitting.
Now, gather the yarn for that graft and thread it through a blunt needle, such as a tapestry or darning needle. This smaller needle will be your main tool for this process.
Grafting Your Knitting
First, run the blunt needle through the end stitch on the knitting needle held closest to you, as if you were adding another purl.
Pull the thread through, but leave a tail of several inches open on the end. Leave the stitch on the needle.
Next, run the blunt needle through the end stitch on the knitting needle held farthest from you, as if you were adding another knit.
Once again, pull the thread through without pulling the tail too short. Make sure to run your yarn under the knitting needle for this step.
Once you’ve run your knit stitch under the back knitting needle, run the blunt needle through the first stitch on your front needle, as if to add a knit. This time, drop the knit off the knitting needle.
Then, run the blunt needle through the second stitch on the front knitting needle, as if adding a purl, and pull the yarn through once again.
Run the yarn through the first stitch of the back needle, as if adding a purl, and drop the stitch from the knitting needle.
Finally, run the yarn through the second stitch on the back needle, as if to knit.
The Final Stitch
As you may have guessed, “finally” is really a matter of how long your graft knit is going to be. From here, you simply repeat the above steps, beginning with the knit on the front needle and running back and forth.
If you’ve followed the instructions, you can keep track of the progress in your Kitchener stitch very easily. Just remember that the front needle is always knit first, purl second, and the back needle is always purl first, knit second.
Throughout, be sure not to pull your graft knit too tightly or leave it too loose. Keep the tension as consistent as possible, so as to create a clean mix between your knitted pieces.
As with numerous stitches you will encounter, the Kitchener stitch may look difficult spelled out in words, but gets easier as you find your rhythm and practice!
Where to Use Your Kitchener Stitch
The best thing about this stitch is just how versatile it can be!
You can join knitted pieces in straight lines or curves, on large stitches or small, and with the very same yarn if you want to make your grafting knit nearly invisible.
The next time you have a project that can’t be left open-ended, use your new skills with the Kitchener stitch to bring all the pieces together into a single knitted section you can be proud of!
Here’s a video showing more details on Kitchener Stitch knitting.
Have you mastered the Kitchener stitch?
Great Kitchner stitch demo I’ve ever watched, thanks so much.