
While various modern sewing machines can differ in what they have to offer, most have a core set of features available. In this guide we take a look at the different parts of a sewing machine, from the needle bar, to the hand wheel, to the presser bar – there’s plenty of basic parts to learn with this machine.
The rest of the features revolve around personal preference and the intended purpose of the machine.
Since needles can be sharp, you will need to take precautions when using your machine. Fabric should always be guided over a throat plate while keeping the fingers one to two inches away from your presser foot.
If you need to pause between stitches, remove your foot from the foot controller so the needle doesn’t accidentally go into motion. Longer breaks warrant turning the machine completely off.
This will prevent accidental stitches and prolong items like small light bulbs which illuminate the work conducted.
Parts of a Sewing Machine
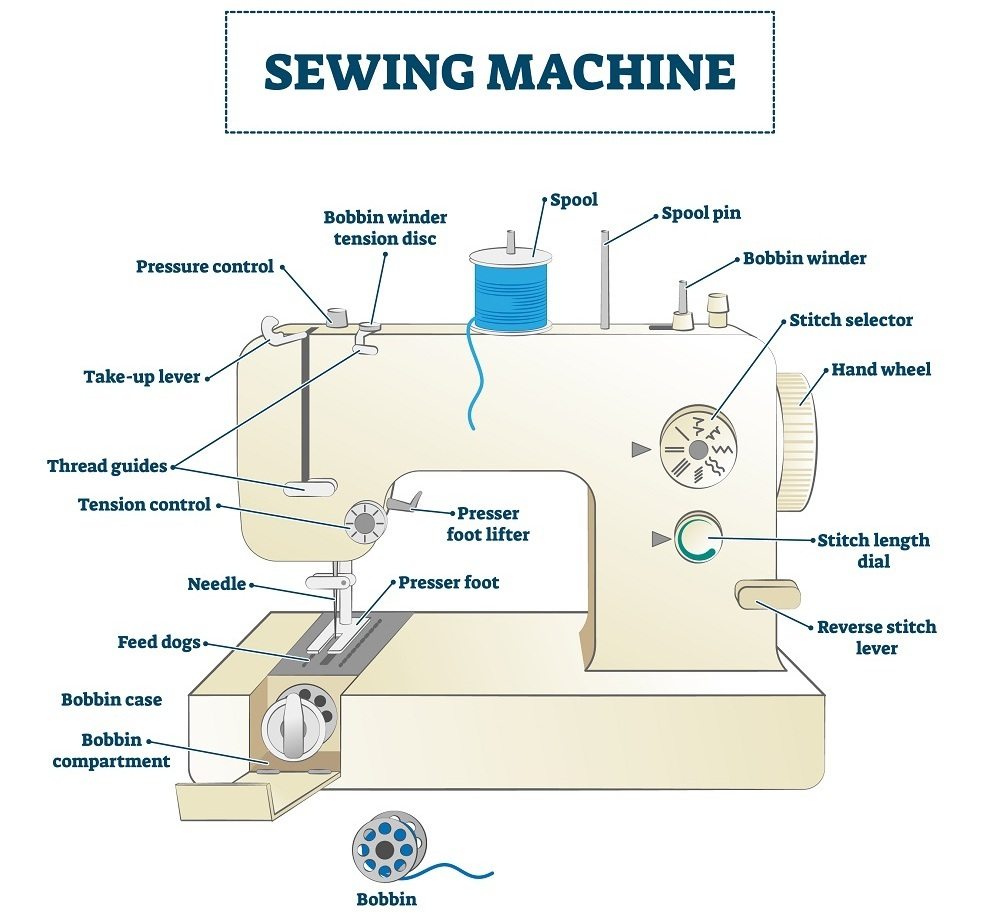
The parts of a modern sewing machine are as follows:
- Foot Controller. This partially controls the stitches’ speed by pressing on it. It will allow you to go faster for straightaways, and slower for more detailed work. Think of it as your sewing machine’s gas pedal.
- Menu Screen. Computerized and electronic machines come with a menu screen which allows the user to adjust stitches, be creative with their stitches, adjust functions, adjust stitch width and length.
- Stitch Width Selector. Manual machines (some electronic) contain a lever or dial which controls a decorative stitches’ width. An example would be a zig-zag stitch.
- Stitch Length Selector. Using this sets the stitches’ length. It is found on some electronic and manual sewing machines. Stitches can be measured per inch from zero to 20, or numerically ranging from zero to nine. General sewing would involve medium length stitches, while finer, more delicate materials will require shorter stitches.
- Stitch Selector. Older machines have a dial allowing users to select between different stitches. Meanwhile, newer models have buttons that select the stitch.
- Flywheel. Also known as a handwheel, the flywheel lowers and raises your take-up lever. The flywheel should always be turned towards you and will be turning towards you when the foot controller is pressed.
- Spool Pin. The spool pin is a small dowel that holds the sewing thread in place. Some models have several spool pins that use different types of spools or for decorative sewing. They can be vertical or horizontal. However, horizontal spool pins are more desirable as they have a smoother thread feed.
- Thread Guides. Beginning from the spool pin, a thread passes through the thread guides (metal loops) that regulate thread tension.
- Bobbin Winder. Empty bobbins are put on this winder so that it can be filled with thread from a spool. To make sure your thread is evenly wound, begin with an empty bobbin.
- Bobbin Winder Tension Disk. If you have an external bobbin winder, a tension disk will enable you to guide the thread between winder and spool.
- Take-Up Lever. Top threads pass through a metal lever. This lever moves upwards and downwards with the needle. Depending on your machine, it may jut out from the front or can hide inside a plastic casing. Prior to placing fabric under your presser bar, it should be fully raised (at its highest point). This will prevent your needle from snagging on the fabric and breaking.
- Tension Regulator. The tension regulator is a dial that controls the top thread’s tension. With proper tension enabled, the bobbin and top thread should join for uniform stitches. If too tight, stitches pucker and break. Too loose, and they will not hold.
- Bobbin/Bobbin Case. Bobbins are wound with thread and comprise the stitch underneath. There can be a top drop in style, or front-loading bobbin. The case holds the bobbin in place and is not interchangeable with different machines.
- Presser Foot. A removable foot that keeps the fabric in place while sewing. Various feet are available for different techniques or fabrics.
- Needle/Needle Clamp. These are removable and come in different sizes/strengths depending on the fabric being used.
- Throat Plate. A metal plate that rests below the needle and the presser foot. Its small opening allows the bobbin thread to come up and out. The needle can pass through to make stitches. Most have small lines serving as guides for a straight stitch.
- Feed Dogs. A small metal/rubber tooth pulling material between the throat plate and presser foot. They regulate stitch length by controlling the amount of fabric passing through. As fabric is guided, allow the feed dog to move the fabric.
Each sewing machine part works in tandem to provide users with a superior stitch and allow you some creative license while sewing. While the operation is basic, and doesn’t vary much between machines, it is still good to know the function of each part.
See more about sewing machine parts and their functions in this video: